Choosing Your Size

To help choose the right size, you will need to measure your bust, waist and hip.
Use a tape measure over your underwear or form fitting clothing and compare your body measurements with those on our size chart, choosing the size that closest matches your measurements. If you do not have a dress makers measuring tape (one that is soft and can hug your body), you can use a piece of string to place around your body, mark the length and then spread the string out on a long ruler.
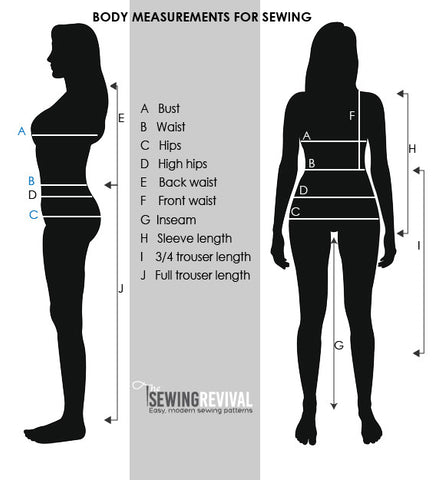
The chart below indicates where to measure your body.

Use the diagram above to help you measure on the right spots.
BUST:Measure around the back, under the arms and across the fullest part of the bust. The tape measure should be flat against the figure, straight across the back and not too tight.
WAIST: Measure around the waist, with the tape measure flat against the figure and snug but not too tight.
HIPS: Measure over the fullest part of the hips, usually 21-23cm / 8-9” down from the waist. The fullest part of the hip maybe higher or lower depending on the individual figure.
WHAT SIZE SHOULD I PURCHASE?
We sell most of our patterns in bundles of 4 sizes. This gives you the opportunity to grade between sizes if you need (and allows you to sew a different size if your body weight fluctuates). The size bundles are listed below:
Small - (NZ/AU/UK 6-8-10-12 | US 2-4-6-8)
Medium - (NZ/AU/UK 10-12-14-16 | US 6-8-10-12)
Large - (NZ/AU/UK 14-16-18-20 | US 10-12-14-16)
X-Large - (NZ/AU/UK 18-20-22-24 | US 14-16-18-20)
SIZE CHART & PURCHASING BUNDLES

Note the measurements in the first section of the size chart above are in centimetres (metric) and the second section is in inches (imperial).
The size chart indicates the pattern size closest to your body shape.
If your measurements are slightly different than our size chart, choose the closest size, as none of our patterns are tailored so that they require a perfect fit.
Sizing FAQs
What if I am "in between" sizes?
There are 3 ways to help choose a specific garment size to sew (all available from the pattern listing page) if you are "in between" sizes:
1. Use the Finished Garment Measurement chart provided for each pattern.
This chart indicates how much "ease" (extra room) a garment style has. It also tells you if there is "negative ease" (for example a fitted top designed for knits and stretch fabric which is made to stretch over/around your body). A garment with lots of (positive) ease would be baggy or over sized.
Check the measures around your bust, waist or hips to help decide if you need to choose the size up or down.
2. We also suggest you read the comments under the "Size & Fitting" tab for each pattern.
3. Read the Customer Reviews for each pattern which can also give a good indication for fit. Please ensure you check the "Pattern Updates" tab in case a pattern has been re-sized after consistent feedback from customers.
What if I am a mix of sizes - my body measures say, a size 12 top and a size 14 bottom?
Most of us do not fit perfectly in to a standard size (which is a great thing as the world would be a boring place if we did!). In this case it is easy to grade between sizes. We have a tutorial on how to do this here. Basically, using the Adobe layers feature for this example (lets say you are sewing the Nikau dress), you would print size layers 12 and 14 and then, using a highlighter pen, trace off the size 12 top and cross over to the size 14 hip - making a smooth line from just above the size 12 waist out to the size 14 hip. You would need to do this for the front and back pattern pieces and transfer the notches for the pockets.
What if I am taller/shorter than your standard size?
That's easy too! Each pattern has a shorten/lengthen line and we have a more detailed tutorial on how to lengthen or shorten your pattern here. In some cases (like a simple dress) it's simply a matter of lengthening the hem, but in other cases you need to use the shorten/lengthen line to ensure the garment keeps the intended shape.
