Adding tiers to your dress
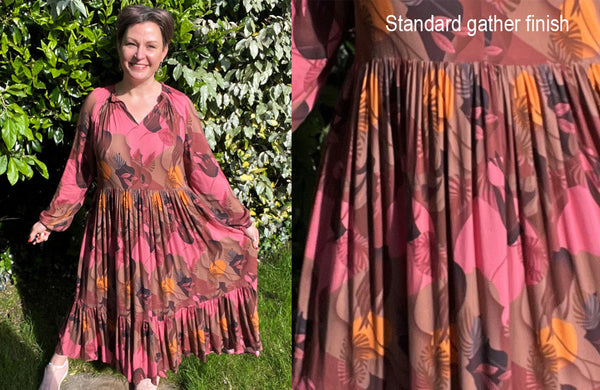
 Adding tiers (gathered layers) to a dress is super easy. The image above is an easy hack of the HERON DRESS - with 2 layers added (one gathered on to the high waist and the other between the knee and thigh).
This tutorial shows examples of how we have added tiers to the Egret & Heron dresses, but exactly the same method applies should you wish to layer up your Fernbird dress (or just about any dress for that matter).

There are several things to consider when deciding on the style of your tiered dress (or skirt). Largely the weight and drape of the fabric you are using, how you wish your layers to look (proportion, placement and symmetry). Our examples using the Egret dress pattern and the Heron dress (below) both use 2 a-symmetrical layers (the layers are not the same length).

Gathering ratio:
This does depend a little on the drape and weight of your fabric, and your desired finished lookl, but we recommend a gather ratio between 1.5 and 1.7 times the layer above. The rust coloured gorgette in the Egret dress above has layers gathered at 1.5x and the Heron dress sewn in a rayon was gathered at 2x.

Fabric drape and weight:
The lighter (less dense) your fabric and the better the drape, the more "elegant" and less bulky your layers will be when gathered. Similarly, the converse is the less drape your fabric has, the more full your layers will become. Too much gather and little drape will cause your tiered dress to look like a tent.
In our humble opinion, layered dresses work best in a lighter weight fabric with good drape (rayon, viscose, tencel, gorgettes). Cotton lawn also works because it is light weight, even though the drape is "mid range".
Linen also works if it is light weight (shirt weight) and a gather ratio of 1.5x is used. You can also improve the drape of the linen if you cut your layers on the bias.
Layer proportion and placement:
This has a significant impact upon the look and feel of your finished dress.
You may decided to sew your layers evenly distributed (say, 3 layers the same length) or at different lengths making 1 shorter than the other.
Deciding where to position each layer is also important. Do you start under the bust, at the waist or lower for example. If you have a larger bust, you may enjoy the open neck Heron dress starting your first tier at the high waist.
Don't forget to consider your in-seam pocket placement if required (this usually starts approx 22cm down from the underarm). You do not want your layers to join near the pocket.

The sketches above highlight the different looks that can be achieved simply by considering the placement and size of your tiers.
Number of tiers:
You will create quite a different look if you decide to sew your dress with 4 small tiers compared with 1 or 2 larger ones in different lengths.
Gather finish:
1. Simple gather. The easiest to construct is a simple gather of the lower tier to fit the width of the upper tier. Simply pin and sew in place with the right sides together removing the gather stitch once sewn. Finish your seam with an overlocker (serger) or zig-zag stitch and press. This is how the tiers on the Heron dress example have been constructed.
2. Ruffle finish (small raised gather). This method is a little more "fiddly" to construct but has a great result if you have the patience.
- First finish the top raw edge of the tier (overlock, serge or zig-zag)
- Now fold 1.5cm of the finished edge to the wrong sideof the layer and press.
- Use a gathering stitch on your sewing machine (long stitch length (5) with the tension increased (I use tension number 8 on my Bernina). You might like to test your stitch on some scrap fabric first. Gather 1cm in from the folded edge.
- Place the gathered tier on top of the bottom edge of the layer above, overlapping them by 2cm. Pin and sew the layers together so that a you create a 1cm seam allowance.

Embellishing:
Adding lace on the gather, or just above it can also add something a little extra. The example below is on a Heron Dress we hacked by adding a low long tier and lace at the bottom of the tier above. We repeated this on the sleeves (using the 2 piece sleeve pattern). We also shortened the sleeve and left it ungathered. This versionof the Heron Dress used the back gather channel with waist drawstring.

Pockets:
If you wish to create in-seam pockets on your dress, you will need to measure down from the under arm to a point where you wish the top of the pocket to sit. As a guide, this is approximately 22cm. Place and sew your pocket per the pattern instructions or refer the tutorial here.
BASIC INSTRUCTIONS
Instructions differ depending on whether you are constructing the standard gathers or the raised (ruffle) gather.
Sewing a standard gather.
(i) Measure from your neck to the desired finished length.
(ii) Decide where each layer will join (for this example lets say we are creating 2 tiers, the first is 25cm in length and the second 40cm, and want them to be placed 50cm (lets call this point A) and 75cm down (point B) from the centre back neck respectively).
(iii) Calculate the width and length of each tier according to the following formulas:
Length = the difference between points B - A plus 2cm seam allowances (75-50+2=27cm)
Tier 2 > Width 1.5x the width of the layer above
Length = the finished length of the second layer plus 1cm seam allowance plus hem allowance (40+1+3=44cm)
Cut 2 rectangles for each tier if your calculations are on the half.
2. With right sides together, sew the 2 rectangles that create the first tier together at the side seams (1cm seam allowance).
**If you wish to add pockets on the side seams of a layer, please refer our tutorial on sewing in-seam pockets here. You will need to do this before you sew the sides of your tier up.**
Repeat for the second tier.
3. Set your stitch length and tension to gather the top of each tier, 8mm down from the edge. Let your sewing machine do the gathering for you(stitch length 5 and tension 8).
Gather the top of each tier. You may choose to sew 2 parallel layers of gather stitches to help prevent the thread breaking - or you may choose to gather the top in sections.
4. Gather the tier until it is the same size as the layer above.
5. With right sides together pin and sew the first tier to the bodice using a 1cm standard stitch. Remember to return your tension and stitch length to normal.
Remove the gather stitches.
Finish the raw edges (overlock, serge, zig-zag).
6. Repeat for the second tier.
Press
Sewing a raised ruffle gather.
(i) Measure from your neck to the desired finished length.
(ii) Decide where each layer will join (for this example lets say we are creating 2 tiers, the first is 25cm in length and the second 40cm, and want them to be placed 50cm (lets call this point A) and 75cm down (point B) from the centre back neck respectively).
(iii) Calculate the width and length of each tier according to the following formulas:
Tier 1> Width 1.5x the width of the bodice at the bottom
Length = the difference between points B - A plus 3.5cm seam allowances (75-50+3.5=28.5cm)
Tier 2 > Width 1.5x the width of the layer above
Length = the finished length of the second layer plus 2.5cm seam allowance plus hem allowance (40+2.5+3=45.5cm)
Cut 2 rectangles for each tier if your calculations are on the half.
2. With right sides together, sew the 2 rectangles that create the first tier together at the side seams (1cm seam allowance).
**If you wish to add pockets on the side seams of a layer, please refer our tutorial on sewing in-seam pockets here. You will need to do this before you sew the sides of your tier up.**
Repeat for the second tier.
3. Finish the raw edges of the top edge of each tier (overlock, serge, zig-zag).
Fold under the top of the tier 1.5cm towards the back. Press.
4. Set your stitch length and tension to let your sewing machine do the gathering for you (stitch length 5 and tension 8).
Gather the top of each tier 1cm down from the folded edge. You may choose to sew 2 parallel layers of gather stitches to help prevent the thread breaking - or you may choose to gather the top in sections.
Gather the tier until it is the same size as the layer above.
5. Right sides up, place and pin the top of the gathered tier to the layer above placing the gather line 1cm up from the bottom edge of the layer above. This can be fiddly so take your time and use lots of pins.
6. Sew the tier in place using a normal straight stitch (remember to return your tension and stitch length to normal).
Remove the gather stitches.
Repeat for the second tier.
Individualise your style....


Tips & tricks
Tips for grading between sizes, sewing a combined neck and arm facing, using bias tape, understitching, sewing in seam pockets and more>