Tutorial - One Piece Short - FREE PDF Pattern
|
2. Sew along the FRONT seam line (from the waistline to the bottom of the crutch. Repeat for the BACK seam line. |
 |
| 3. Cut notches on the outside of BOTH front and back seams to allow the fabric to move and bend at the curves. |
 |
|
4. Open up the pants, keeping the wrong side up (right side of fabric together), so that the front and back seams sit on top of one another. Press open the seam. |
 |
|
5. Pin the front and back crutch seams together. Sew. |
 |
| 6. To hem the legs. Fold 1cm up from the bottom edge of each leg. Press flat with an iron. Then fold again up 1.5 cm. Press and pin in place. The folded edge of the fabric should be in line with the dotted hem line marked on the pattern. Measure and check. Correct if necessary. Sew in place. |
 |
 |
|
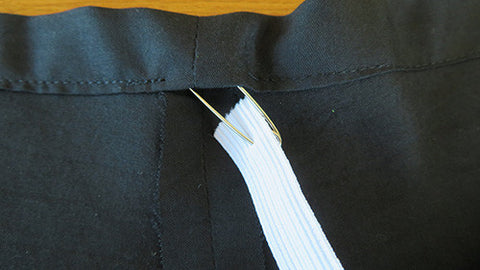
7. To hem the waist and create a channel for the elastic; fold down 1 cm from the top edge and press flat with an iron. Fold down 3 cm and press again. Make sure you leave a 2 cm gap at the back to insert the elastic. Mark the gap and sew the waistband channel. |
 |
| 8. Measure the elastic around your waist so it is firm but not tight. Cut the length to your waist measurement plus a 1 inch overlap. Thread the elastic through the waistband by clipping a safety pin to one end of the elastic and feeding it through until it comes out of the gap again. |
 |
 |
 |
|
9. Make sure the elastic is not twisted inside the waistband. Overlap both ends by 1 inch and sew together using a zig zag stitch. Massage the elastic so it sits back inside the waist band.
|
 |
|
10. You may like to add some personal touches like a ribbon bow at the front waist or lace to the hems of the legs. |
 |


