We are all aware of the harmful affects of chemicals and dyes, not only for our bodies, but also for the destruction it causes to our natural environment. Chemical dyes pour into waterways around the globe to satisfy our demand for stay-fast colour on leathers and fabrics that we then place against our biggest organ - our skin.
I happened upon a couple of innovative earth mothers at the Nelson markets last year who were dying beautiful silks with natural dyes and then sewing them in to scarves and pillowcases. They used a type of "compost" technique (yes, I asked her confirm what she had told me)....by placing eucalyptus and rose leaves inside the wrapped up silk and then burying them in a compost pile - where the temperature sets the imprint of the natural "matter" into the cloth. After a little more research I discovered the more technical term for this technique is "botanical imprints" making (also known as eco-printing or contact printing) . I have had fun adding images of this technique to one of my pinterest boards. Check it out here: https://www.pinterest.nz/TheSewingRevival/diy-art-craft/natural-fabric-dyes/
I decided to give this a go "one day" but headed home to have a play with an easier option - dying a piece of unbleached linen I purchased especially for the occasion - with a natural, home made dye. During my market chat we discussed what plant materials produce different colours. I learnt that onion skins, boiled down, produce a beautiful rich mustard ocher, natural fibres soaked in black tea result in an "antique brown" (tea is often used to stain paper and card to produce an aged appearance). Avocado pits (cores) & skins result in a beautiful pink. Not having an abundance of avocados, and having played with tea before - I was set to try the onions.


1. I first soaked my unbleached linen in water (to help the even distribution of the dye once added). Using natural fabrics (preferably as untreated as possible) - like cotton, linen or silk work best as they are porous and absorb the dye better.
2. Gathering up my onion skins (I tried to fill the pot knowing they would boil down). Start saving your onion skins (we had a lot of curries prior to this project)!
Place the onion skins into a saucepan or pot and cover with water generously. Bring to the boil and simmer for approximately 30-45 minutes. Once you have a lovely color in your dye pot, strain the skins off and discard them. I added a wee bit of tumeric at this point (knowing the colour it makes my hands if I spill any whilst cooking with it - I thought it sure to improve the vibrancy and stain/dye). This pimped up the colour I thought although I am no expert here - it was a fun way to experiment though. As with most natural dyes, the ratio of dye stuff to textile will yield differing results. Have a good old play.


3. Whilst you need to be careful boiling fabric due to shrinkage (and safety), and having used chemical dyes before, I decided to add salt which helps set the colour into the fabric. Once the dye was salted and all the debris removed, I turned off the heat and carefully added the fabric, gently moving it around in the pot to disburse the dye as evenly as possible at this point.
I left the fabric for about 6 hours (some say to leave for 24 hours but I was impatient - and I also needed to cook the evening meal!). During this time I gently massaged and moved it in the pot to circulate the dye (lots for the first half hour and then once every 30 minutes after that). A bigger pot would have been handy.
4. After 6 hours (you might like to leave yours longer) the dye was well cooled. To ensure the fabric was evenly dyed - I popped it in the washing machine (along with the onion skin dye) and put it on a rinse and spin cycle suspecting the spin would help more evenly disburse the dye.
Once removed from the washing machine, I hung the fabric to dry (initially out of the sun). The colour lightened, but I am right "chuffed" with the result.
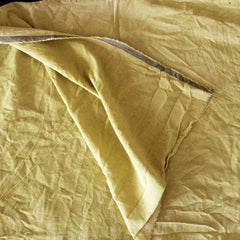

No - it's not perfect, but it is pretty good. I have a few ideas on what I will sew it in to - but that's for another post.

If you are interested to explore more, there are some links below to get you started. The more you play, the more you will learn.
A great project for the school holidays!
Sewing suggestions:
We think these would look great sewn up with your hand dyed cotton or linen....
https://thesewingrevival.com/products/fantail-tank
https://thesewingrevival.com/products/tui-dress
https://thesewingrevival.com/products/sidewinder-pant
https://thesewingrevival.com/products/fantail-shirt
https://thesewingrevival.com/products/heron-dress
https://thesewingrevival.com/products/short-skort
Oh...and there's more to come.....
More links to explore further:
>Dying with onion skins http://www.allnaturaldyeing.com/onion-skin-dye/
>Using avocado pits to dye your fabric pink: https://www.youtube.com/watch?v=TcUbZV6OZXk
>Using coffee and tea https://www.apartmenttherapy.com/how-to-dye-textiles-with-coffee-tea-108438
The Sewing Revival Pinterest Board (Natural dyes)
https://www.pinterest.nz/TheSewingRevival/diy-art-craft/natural-fabric-dyes/

